
Artwork Guidelines
After placing your order, you'll receive an email with a link to access our Good2Go Artwork Portal (link to upload URL) - you will need the link to access your order in Good2Go. From there you can upload artwork, communicate with our Graphics team, and approve your artwork. Once all pieces of artwork within your order are approved, production begins! When approved by 12pm Central, most products ship the next day.
For help preparing your artwork, read on!
Overview
The guidelines below will put you well on your way to large format design greatness! (Exciting, right?)
Large format graphic design concepts can differ from the norm - so please check the details carefully. If you already have artwork and are ready to upload, please visit our Upload and Approval Instructions (link to Upload Instructions URL) page for details on the upload process. If you hit a snag at any point, please don't hesitate to email our Graphics & Prepress Department at graphics@abex.com
Download the Latest template file
95% of artwork processing delays arise from templates not being used or followed.
We update our templates from time to time, so make sure to always start with our latest, greatest artwork templates.
You can download the latest template from the product page for the product you ordered, or from the link in your confirmation email.
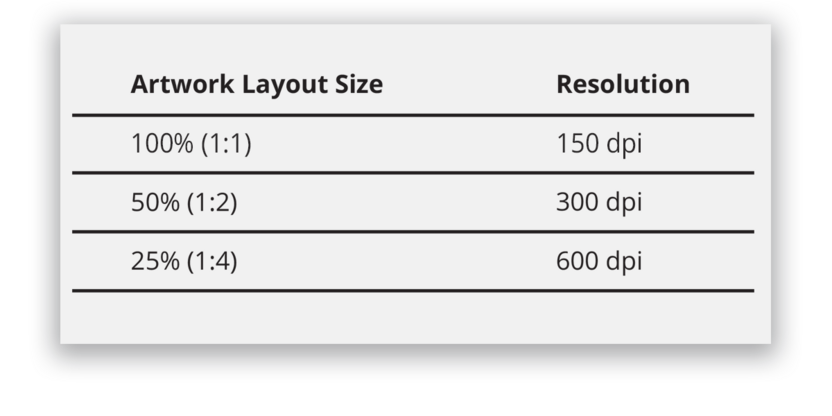
File Size & Resolution
All of our templates are precision-built to achieve the best possible output. Nearly all of our templates are built at 50% (very large products are built at 25%). We will output your file at the correct size, just make sure you include enough image resolution per the table below.
Take care when purchasing images to buy high resolution images - the more pixels, the better. Usually, for large format output you will want the highest resolution image available. That said, keep in mind that normal viewing distance for most of our products is 5 feet or more. Less than optimal image resolutions, if that's all you have, don't always look as bas as you might think.
Image Resolution Table
Color & Transparencies
Color Mode
All colors must be provided in CMYK color. Any other color spaces in your file will be converted to CMYK.*
Color Management Geeks - Use the GRACoL CMYK profile for the most accurate results.
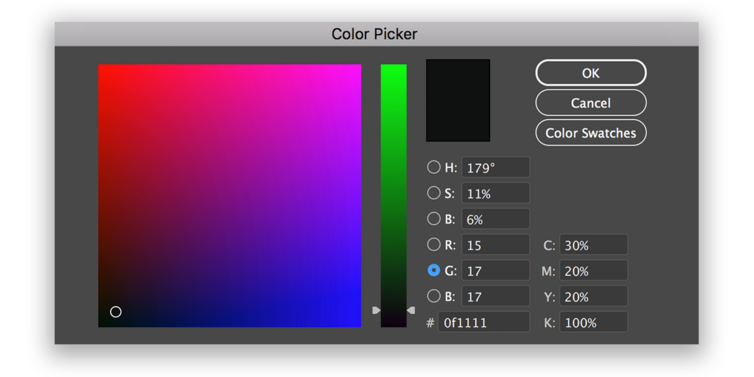
Rich Black
We advise C30 M20 Y20 K100 for a rich, neutral black. Black colors that use more ink than this, or where the K value is lower than the other values, will not reproduce well.
Ink Density
Avoid using too much CMYK ink in your design. For more info, see our Ink Density page.
Transparencies
Be aware that transparencies can result in unpredictable color shifts. If you provide transparent (unflattened) artwork, we will flatten it prior to output.*
PMS Color Matching
We print with CMYK inks. When a PMS Color Match is purchased, we will do our best to match the CMYK equivalent of the PMS color specified. Photos & Gradients cannot be color matched.
*Note: Abex Displays will not be liable for any color shifts that may result from flattening or color space conversion.
Text
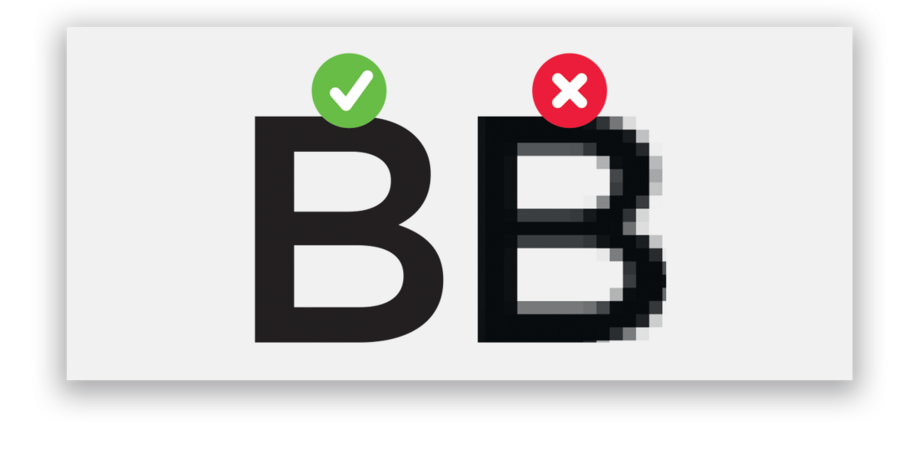
Text should always be vector, not pixels, for highest quality output.
Fonts must be embedded or converted to outlines. Artwork with missing fonts will be rejected.
Visibility
Only leave final artwork visible. If you don't want it to print, then it must be on a layer with visibility turned off.

File Format
High resolution PDF files are strongly encouraged.
JPG or TIF files are acceptable but discouraged since vectors and text will be rasterized. Files provided in other formats or with low resolution may be rejected.

Artwork Areas
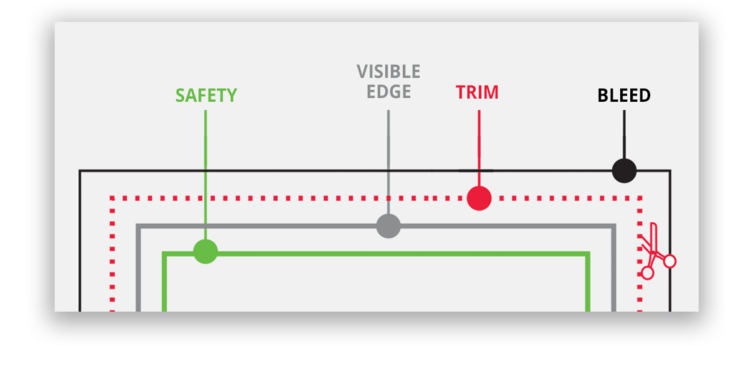
Bleed
The outermost edge. Any graphic element that touches Trim should be extended all the way out to Bleed to ensure a clean edge.
The area between Trim and Bleed will be cut off.
Trim
Where the media is cut of trimmed prior to finishing.
Visible Edge
The final, visible edge of the product after finishing. The area between Trim and Visible Edge may be hidden or impacted by hemming, etc.
Note: on some templates, Trim and Visible Edge are the same.
Safety
The safe area for critical text and graphics. All important text, logos, images, etc must be kept within this area.
The area between Safety and Visible Edge may be impacted by curvature, stratching, stitching, etc.
Questions?
If you have any questions or if you would like a PDF-version of these guidelines, please do not hesitate to email our Graphics & Prepress Department at graphics@abex.com.
About Abex Displays
Today, Abex Displays can be found wherever trade shows and events take place in over 60 countries on every continent. Abex offers one of the broadest lines of portable displays and counters for conventions and expos in just about any industry. From portable pop-up displays and easily installed tension fabric displays to custom hybrid exhibit systems with laminated wood panels joined with SEG graphics, Studio Abex will design and build a beautiful and functional custom solution for you or your client's next event. Whichever you choose, you'll enjoy the benefits of portable modular which include lower build cost and reduced storage, transportation and I&D expenses. You'll also rest easy knowing that your structure will be manufactured by a company with over thirty eight years of experience.
